3This tiny smiley face is rendered by this val: 
4
5The image response is cached by the CDN, so make sure to change the image name if you make code changes. Any name with a `.png` extension will work: https://maxm-smileypng.web.val.run/-.png
1export const smileyPNG = async (request: Request) => {
2 const { encode } = await import("https://deno.land/x/pngs/mod.ts");
3 // Dimensions of the image
4 const [width, height] = [10, 10];
5 // Create our PNG canvas
6 const imageData = new Uint8Array(width * height * 4);
7 const y = [255, 255, 0, 255]; // Yellow
8 const b = [0, 0, 0, 255]; // Black
21 t, t, y, y, y, y, y, y, t, t,
22 ];
23 // Move around the bytes and encode the image
24 const smileyFaceData = [].concat(...smileyFace);
25 for (let i = 0; i < width * height * 4; i++) {
26 imageData[i] = smileyFaceData[i];
27 }
28 const png = encode(imageData, 10, 10);
29 return new Response(png, { headers: { "Content-Type": "image/png" } });
30};
10* Create a [Val Town API token](https://www.val.town/settings/api), open the browser preview of this val, and use the API token as the password to log in.
11
12<img width=500 src="https://imagedelivery.net/iHX6Ovru0O7AjmyT5yZRoA/7077d1b5-1fa7-4a9b-4b93-f8d01d3e4f00/public"/>
13
14Migrated from folder: VAL_E/VALLE
3View and interact with your Val Town SQLite data. It's based off Steve's excellent [SQLite Admin](https://www.val.town/v/stevekrouse/sqlite_admin?v=46) val, adding the ability to run SQLite queries directly in the interface. This new version has a revised UI and that's heavily inspired by [LibSQL Studio](https://github.com/invisal/libsql-studio) by [invisal](https://github.com/invisal). This is now more an SPA, with tables, queries and results showing up on the same page.
4
5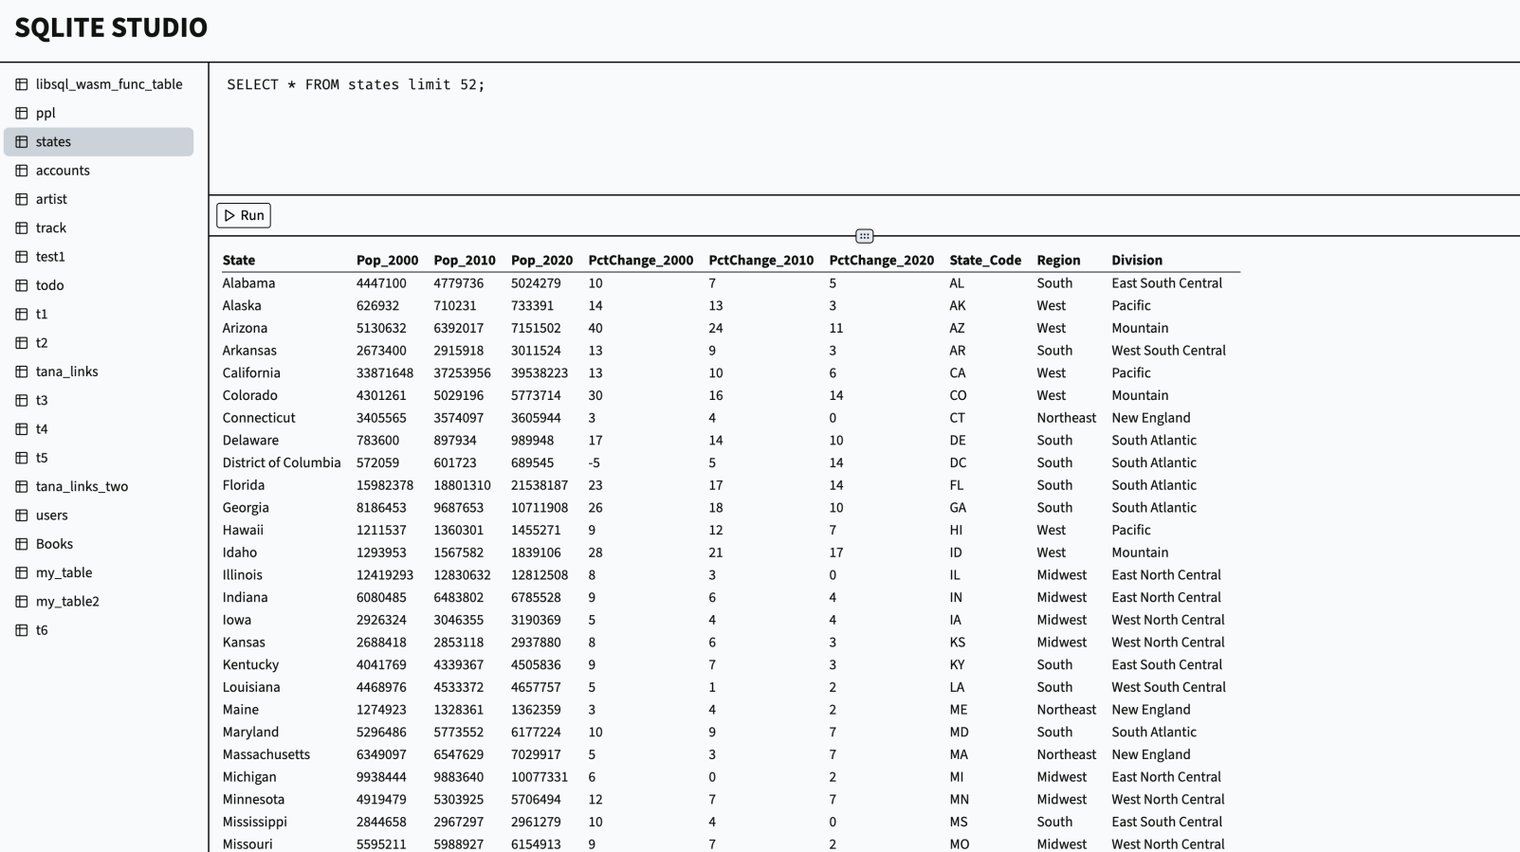
6
7## Install
1import urlHeader from "https://esm.town/v/substrate/urlHeader";
2import { ComputeText, GenerateImage, sb, Substrate, UpscaleImage } from "npm:substrate";
3
4const substrate = new Substrate({ apiKey: Deno.env.get("SUBSTRATE_API_KEY") });
7 const url = new URL(req.url);
8 const searchParams = url.searchParams;
9 const simImage = searchParams.get("image");
10 if (simImage) {
11 const prompt = new ComputeText({
12 prompt: sb
13 .interpolate`Describe an image named ${simImage}. Describe a single subject with background and style details.
14 We'll use this description to generate an image so include creative details like style, vibe, mood, character.`,
15 temperature: 0.8,
16 });
17 prompt.cache_age = 60 * 60;
18 const image = new GenerateImage({
19 prompt: prompt.future.text,
20 });
21 image.cache_age = 60 * 60 * 24;
22 const res = await substrate.run(image);
23 const imageUri = res.get(image).image_uri;
24 const base64Data = imageUri.split(",")[1];
25 const imageData = Uint8Array.from(atob(base64Data), c => c.charCodeAt(0));
26 return new Response(imageData, {
27 headers: {
28 "Content-Type": "image/jpeg",
29 },
30 });
39 }
40
41 const instructions = `all images should be in the form /?image=<image description including art style>.
42 always use descriptive image names including the particular style (e.g. photograph, illustration).
43 include plenty of local urls to other pages on the same domain.
44 all urls must be in this format: /?url=<full url with a domain, descriptive path, and params>.
3This is a lightweight SQLite Admin interface to view and debug your SQLite data.
4
5
6
7It's currently super limited (no pagination, editing data, data-type specific viewers), and is just a couple dozens lines of code over a couple different vals. Forks encouraged! Just comment on the val if you add any features that you want to share.
3View and interact with your Val Town SQLite data. It's based off Steve's excellent [SQLite Admin](https://www.val.town/v/stevekrouse/sqlite_admin?v=46) val, adding the ability to run SQLite queries directly in the interface. This new version has a revised UI and that's heavily inspired by [LibSQL Studio](https://github.com/invisal/libsql-studio) by [invisal](https://github.com/invisal). This is now more an SPA, with tables, queries and results showing up on the same page.
4
5
6
7## Install
4
5<div align="center">
6<img src="https://imagedelivery.net/iHX6Ovru0O7AjmyT5yZRoA/67a1d35e-c37c-41a4-0e5a-03a9ba585d00/public" width="700px"/>
7</div>
10
11<div align="center">
12<img src="https://imagedelivery.net/iHX6Ovru0O7AjmyT5yZRoA/67a1d35e-c37c-41a4-0e5a-03a9ba585d00/public" width="500px"/>
13</div>
13 );
14 }
15 const base64Image = await qrcode(url.toString(), { type: "text/html" });
16 return new Response(
17 `<html>
20 </head>
21 <body>
22 <img src=${base64Image} style="margin: 0 auto; max-width: 600px" width="100%" />
23 <p style="font-size: 0.85rem">QR Code generated using <a href="https://val.town">val.town</a></p>
24 <p style="font-size: 0.85rem">Built with 💗 by <a href="https://twitter.com/neverstew">Neverstew</a></p>